

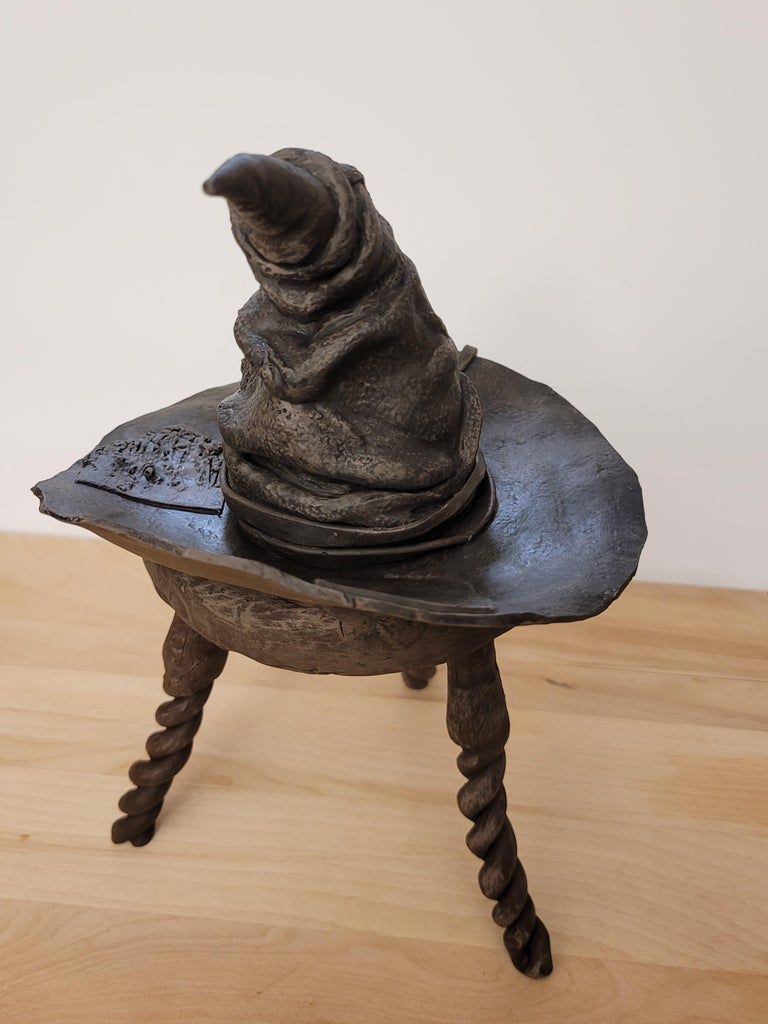
Introduction: Clay Sorting Hat Pencil Holder on Stool (Harry Potter)


I recently started reading Harry Potter for the first time. The books are amazing! I am quickly becoming a potter-head. I really wanted to make something from the book for the contest, so I decided to make the Sorting Hat and make it a pencil holder. I wanted it to be functional and because it is so big, it is perfect for a pencil holder. I hope you enjoy this tutorial on how to make the Sorting Hat.
Supplies


Materials:
Colored Super Sculpey (different shades of brown)
Super Sculpey Premo (black)
Super Sculpey Ultralight
Liquid Sculpey Bake and Bond
Tinfoil
Armature wire
Cutting mat
Clay pasta maker or Rolling Pin
Pliers
Paper, Pencil, Eraser, and Ruler
Lamp/light source
Sculpting tool
Knife/blade
An oven
Step 1: Sketching


To make this Sorting Hat pencil holder you may want to sketch out your design first. I sketched out how big I wanted the sculpture to be, how many holes there would be for the size of the sculpture, and where the holes would go. The sketch can be really simple, but you might want to draw it to scale for the size of the sculpture.
Step 2: Tin Foil

Next, you will take some tin foil to make the hat shape. Form the foil into the shape you want for the hat. I made mine into a cone with a slight tilt for the tip of the hat. Remember that the tin foil will be all of the space the pencils or other things will be in, so it has to be big enough.
Step 3: The Shell


Take your Super Sculpey Ultralight and run it through the pasta maker to create a thin sheet. Wrap the thin sheet of clay around the tinfoil. Do not put the Super Sculpey Ultralight on the bottom of the tinfoil so that there is a hole in the bottom of the hat form when you bake it. When you have the clay wrapped around the foil form as evenly distributed as possible, mark out where you want the holes to be, and then cut them out using a knife. You want the holes to be as big as the things you are putting inside (i.e. pencils).
When you are finished cutting the holes, you are ready to bake. Bake in a pre-heated oven at 270F for 10-15 minutes. After you remove it from the oven, let it cool. When it is all cooled off, use pliers to remove the foil in one piece from inside the clay form. If all of the tinfoil is one piece to start with, it will be a little easier to pull out in one piece. You want to pull all of it out to create as much space as possible inside the clay form. You might want to carve the holes and the bottom a little more to make them smooth.
Tip: Keep the tinfoil in one piece. It will be used later for the stool.
Step 4: Body Shape/Anatomy


I used colored clay for this entire project to make the painting easier, but I didn't have the right shade of brown. I decided to mix black clay with brown to make a dark brown. I started covering the clay cone form with Bake and Bond Liquid Sculpey. Then I started making a thin sheet of the dark brown clay from my pasta maker, and covered the entire cone.
I made sure there were no air bubbles trapped under the clay, and started rolling thick strings of clay. I added a thick clay string to make the eyebrows, and to give it more expression I pushed one eyebrow up and one down. I placed two of the clay strings at the bottom of the hat where the mouth would be. I formed the mouth by adjusting each string to make lips by moving parts up and down to make it more random and realistic. I also made two long strings and put them at the top of the hat to shape into wrinkles. I added a small cone of clay to the top to make the point of the hat and shaped it to bend down a little bit.
Step 5: Highlights and Wrinkles


When I started this step, I actually ran out of brown clay, so I went to the local craft store and bought two shades of brown clay, and more black Premo clay. I used the lighter shade of brown for the wrinkles/highlights. I tried to closely follow the reference picture/video from the Harry Potter movie to make the wrinkles more accurate. I added additional wrinkles, and then added two patches. I added one patch on the cheek. To make it look scraped and cut up, I used my knife to dig and cut at it. I also added one patch near the top of the hat on the back side. I added detail to that patch by making little nicks and marks on the sides with my knife.
Step 6: Refining and Texture


When you want to start adding texture to the rest of the hat, make sure that you are happy with the overall shape of the hat. This means smoothing out every nick and mark that is not purposeful.
To start giving the hat texture, use a texture ball or roller. You can make one by forming extra clay that you have on hand into a small ball shape, and cover it with plastic wrap. You can poke different sizes of holes all over the clay ball. The reason you have to use plastic wrap over the clay, is so that the holes are smoother and there are no sharp edges.
Use the textured ball of clay by pushing/rolling it gently onto the clay hat form where you want the texture to appear. I prefer to use the texture ball instead of poking holes onto the actual hat, for 2 reasons: 1. It's quicker and easier, and 2. The tool makes the bumps look like they are popping out of the clay, rather than it being pushed in.
Step 7: Bake


When you have covered the entire clay hat sculpture in texture and are happy with how it looks, you can bake it. Bake it in the oven at 270F for 20 minutes.
Step 8: Inside the Hat


When the clay has cooled down, spread some Bake and Bond inside of the hat, then roll out some sheets of black clay (or whatever dark color you want), and spread them on the inside. It doesn't have to be perfect because you won't be able to see the inside anyway. It is just to make it one color and look nice and dark when looking at the holes from the outside. Make sure you can't see any of the white Super Sculpey Ultralight clay.
Step 9: Brim of the Hat


For this step, I used black Super Sculpey Premo because Premo is a little flexible when baked. That means it won't break after being baked.
To start the brim, you need to flatten a very large piece of clay depending on the size of the sculpture. I used my pasta maker which didn't allow me to make one large piece. As a result I had to connect several pieces of clay to make a square. When I thought it was big enough, I rounded the edges by cutting them into a circle shape. Alternatively you could flatten a large piece of clay with a rolling pin to keep it as one piece and then cut it into a circle.
Tip: When you are done connecting the pieces to make the brim, if there is still a line or mark that is hard to smooth, you can cover it up by putting a thin clay square to act as a patch. Remember it is an old hat that is beat up, so it can look a little ragged.
Step 10: Details/shape


When you are done making the shape of the brim, you can attach the hat. I added two patches as shown in the movie, but you can add as many as you want. I made one patch that was kind of ripped just like the cheek on the hat. And I made the other patch in more of a square shape.
The hat in the movie had a string around the bottom of the hat. I made it by making a very long thin string and flattened it with my pasta maker. Then I wrapped it around the hat very carefully with both ends on one side hanging off the brim.
Step 11: Bake


Just prior to the final bake, I wanted to shape the brim of the hat by lifting it a little bit. I made a circle of armature wire and bent both sides up a little bit. Then I put the hat in the center of the wire, and the wire lifted up the clay of the hat brim. I also used a bit of tinfoil to shape the hat strings so that they wouldn't be flat. I then baked the clay with the wire and tinfoil in place to help maintain the shape. This final bake can be for about 20 minutes at 270F.
Step 12: Base of the Stool

As part of my design for this pencil holder, I decided to make a stool for the hat to sit on. Because my hat is big, I wanted to make the stool large as well. To reduce waste, I re-used the tinfoil from the hat form and re-shaped it into the base of the stool. I started with a square shape but ended up changing it into a circle. I covered the entire base with black clay, but it doesn't really matter what color you use. I cut out a square in the center and filled it with Super Sculpey Ultralight to make it lighter, then I added Super Sculpey Original Beige because I wanted to preserve the black clay for the stool legs. I chose not to make my stool base perfectly smooth as it is meant to be old and weathered. I rolled the base on its side to get extra marks and divots for texture.
Step 13: Legs


To make the legs, I rolled out a very long piece of clay, folded it, and then twisted it. I used a cylinder of tinfoil for the smooth upper part of the leg. I added a piece of armature wire into the tin foil portion of the leg for stability. Unfortunately the wire made it difficult for me to attach the legs to the base, so I removed the wire. If you are able to wrap the clay around the wire at the outset, you may get better stability.
I then added texture by using my knife to make small knicks on all of the legs.
Step 14: Bake


When you are done forming the stool legs and are happy with the texture, I suggest you bake them unattached to the stool base. Bake the stool legs and base at 270F for 20 minutes.
It is important to note that I originally added the piece of wire in the tinfoil because I was going to bake it attached to the base. It didn't work though because I didn't have wire throughout the legs. When I baked them, they all bent, and one of them broke. To salvage my work, I decided to cut them all off and only use the three legs. I chose to trim the edges a little, and I cut the bottom of the legs so they are smooth.
When your base and legs are cool, you can glue the legs one at a time using Gorilla Super Glue.
Step 15: Painting the Base Coat


Now you are ready to paint!
When you start painting, normally you want to start with a base coat. Because I used colored clay for the hat and stool, I could start layering paint without a base coat. I started by mixing several shades of brown with a little bit of black. Painting was easy and quick because the entire sculpture was already brown. When I was waiting for the paint to dry on the hat, I would paint the stool. It didn't take too long or too many coats to paint the stool. Layer the paint to get the colour and detail until you are happy with it.
Make sure to let it all dry when you are done, before moving on to the next step.
Step 16: Dark Wash


Washes are basically really thinned out paints. For beginners, I suggest you buy washes instead of making them yourself because I tried making one and it didn't really work. When you paint with a wash, it goes into all of the cracks and crevices of the sculpture. If you think there is too much wash in one spot, you can either spread it out, or remove some of it with a paper towel by gently wiping it.
I used a brown wash and a black wash, and mixed them together. Then I carefully applied the wash to the areas I was looking for more variation in colour.
This step is supposed to be done before dry brushing, but at the time, I didn't have any washes, so that's why it looks like I painted over lighter paint.
Step 17: Dry Brushing


Dry brushing is a technique that makes the raised areas on texture and surfaces pop. It brings out detail in the sculpture.
To do this step properly, you will need a paper towel or something to wipe the paint off your brush. You will add a small amount of paint to your brush, wipe it off the brush, then paint the sculpture. If you add too much paint to the brush or sculpture, you can always use a paper towel to remove the excess. I used a bigger brush to cover more area and brushed it super quick as it does not need to be precise.
Step 18: End Result!


I am very happy with how this sculpture turned out. I think it looks very similar to the movie, and I am proud of myself. I hope you will enjoy making this just as much as I did. If you sculpt this, be creative with the texture and painting! And most importantly have fun!
Second Prize in the
Fandom Contest


