

Introduction: Personal Crest - "Get to Know Me" Activity With Tinkercad


I teach high school engineering and manufacturing classes. As I'm sure a lot of teachers do, at the beginning of every year I have all my students complete some form of "Get to Know Me" activity. Great activity! It is a fantastic way to start building a positive classroom experience for the year. The actual mechanics of the how I've had the students provide me information about themselves I've found to be BORING.
I've had the students fill out a simple notecard with their basic information, hobbies, sports, likes/dislikes, etc.
I've done student interview scavenger hunts. Asking kids to actually talk to each other face to face usually turns the class into a dud on the first day.
I've had them complete surveys, give "About Me" presentations, and on and on and on. You name a standard way to do this type of thing I've probably tried it at some point in my career. I've found almost all of them boring. The students find all of them either boring or nerve-wracking.
I decided to try a different approach. This project is what I came up with, The "Get to Know Me - Personal Crest" Project.
Supplies
-Paper and Pencil
-Computer/Laptop with an internet connection
-TinkerCAD
-3D Printer (Optional)
Step 1: Video Walkthrough
If you are less of a reader and more of a watcher this video walks through the whole project.
Step 2: Lesson/Activity Introduction
Introduction/Hook
I introduce this activity to the students by showing my class a family crest. I use this website to find a coat of arms and display it to the whole class with my projector. As a class we discuss what we are seeing.
I'll start asking questions like the ones below:
Does anyone know what this is?
What do you see?
What do you think it means?
Does anyone know what these were used for?
Does anyone know if their family has a crest?
During the discussion I might pull up and show them a few more examples from the same website.
I used this Wikipedia page for a general overview for myself before discussing it with the class.
This activity serves two purposes for my classroom. First and foremost, it allows my students the opportunity to tell me about themselves in a creative way. Secondly, I use it as a skills assessment prior to jumping into any of our curriculum for the year.
Time Frame
I plan for this to take about two to three class periods. My classes run 90 minutes. This is an activity I use the first few days of the school year.
Along with covering general start of the year stuff in class (emergency procedures, seating charts, classroom rules, school wide student meetings, routines, etc.) my students will spend the first two to three days in class working on this assignment.
My classes run 90 minutes. The kids will have anywhere between 30-45 minutes each of the class periods I give them to work on this.
If I were running 45-55 minute classes I'd schedule this activity to be worked on over three to five class periods.
Once the students have a basic understanding of what these family crests are I introduce what they will be doing and cover the criteria they will use to create their own personal crest.
Personal Crest Criteria
Students have to incorporate answers to four questions/prompts into their design (listed below). Preferably with as few words as possible.
-Something they are proud of
-Something they are good at
-A personal goal
-Something that makes them happy
The last piece of criteria I give them is a size constraint, which doesn't really come into play unless you are 3D printing the designs.
-Crest has to be no bigger than 3/8" x 2" x 3"
With all of the above covered, we move onto sketching.
Step 3: Sketching
Before I let my students start working with CAD on their design, I have them create three concept sketches of their personal crest ideas.
This is the first classwork I have my students complete. The students walk in on day one, the bell rings, I introduce myself, get the kids in the right seats, I go over the emergency procedures, and then we start this activity.
I don't teach any lessons or skills about sketching or CAD beforehand. Many of my students have taken an engineering class at our Jr. High. At some point in the last two to three years I know they have been taught basic sketching skills. I use this portion of the project as a semi pre-test to gauge their sketching skills.
The sketches don't have to be amazing, but I don't them to by just bad stick figures either. I require the sketches to be annotated. Students need to label the components of their crest and what those parts represent about themselves.
At this point I show my students examples of what I'm wanting them to create by showing them my own sketches. This accomplishes two things. First, It shows the students the basic quality of sketch I want and the format their sketches should be in. Second, it allows the students to get to know me ,their teacher, a little better.

The design for my crest would look have looked completely different when I was in high school. So after showing them what my current ideas area I show them a sketch of an idea I think that my high school personal crest would have looked like when I was a freshman or sophomore.

This usually starts a pretty fun conversation in class. This also lets the students know that their ideas don't have to be super deep, soul exposing thoughts that they have to represent in their design. If they put on their design that their goal is to get a 100% completion on a video game, that's AWESOME! When I was in high school (and probably a few of my college years) that is type of thing I spent my time on too.
When they have completed their sketches I have them show me their work. They give me the overview of their designs and which one they like best. This is a great one on one interaction where I can ask for the backstory behind what they put down on paper. Generally, the design the student likes best is the one I let them do for this activity. As long as its all school appropriate, it's good to go.
I've had my students use standard blank copy paper for this step, but I created a simple handout that I plan to implement the next time I use this in class. The handout just has the information on the criteria, what the students are needing to do and then dedicated spots for them to brainstorm ideas for each of the four areas they need to incorporate into their design. On the back of the paper I'll have them create their sketches. The document is linked/attached below.

Step 4: Tinkercad
With an approved sketch, they can start creating their personal crest in Tinkercad.
Sometimes, I do an in person, entire class demonstration of Tinkercad starter tips and tricks. Sometimes, I provide them with a few short YouTube tutorials. When I get free time I've been making up my own tutorial videos to show in class.
The following are a few of the helpful tips I quickly share with my students.
Workspace Setup
Before starting the design I always have my students change their workspace settings. These setting are shown and can be changed in the bottom right hand corner of the workspace area.
I have my students turn off "Snap Grid" as it usually causes more problems than it solves. That can be accomplished simply by clicking the dropdown menu for the "Snap Grid" and selecting "Off".

I then have my students change their units to "Inches" instead of millimeters. Being in the United States most of my students have very little regular exposure to the metric system.

Object Sizing
With having a size constraint its helpful for the students to know how to easily resize an object. To quickly resize I usually show my students how to click on the object to get a text box to pop up with the dimension they are wanting to change. Then all they have to do is simply type in the value they want. You can also use the sliders in the object menu on the right side of the screen when an object is selected. I quickly go over some version of the GIF shown below.

Align Objects
Being able to position the objects in a quick and accurate way is incredibly helpful. Using the Align tool is the best way I've used to complete that process most of the time. The Align tool can be found in what I always refer to as the "Object Tools" section, which is in the top right corner of the Workspace area.
The GIF below shows the quick process of how to use this tool. The basic steps of the operation are:
1) Select the objects you want to position together.
2) Select the Align tool.
3) Click on the position dots to align the objects in the orientation and position you need.

Grouping Objects Together
Grouping shapes together is also another very helpful process. I show my students how to use do this in a similar fashion to what is displayed in the GIF below. The Group and Ungroup tools can be found in the "Object Tools" section, in the same area the Align tool is located. The basic steps are:
1) Select all of the objects you want to group together.
2). Click on the "Group" or "Ungroup" tool.
The big tip I give is to make sure the objects are touching an in the position you need before grouping them together.
This is a really powerful tool when used with the Align tool.
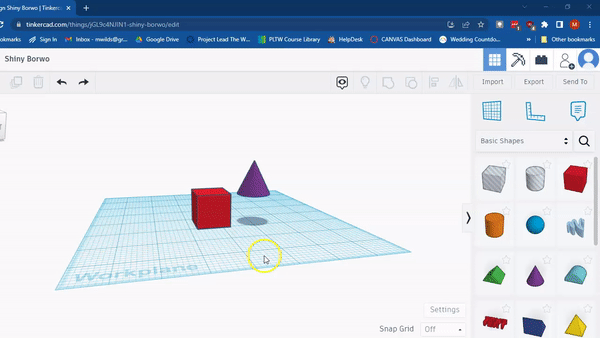
During this portion of the project I want to get the students quickly designing in the program. I want the kids to get comfortable with learning by doing and trial and error.
Developing a growth mindset is one of the major objectives of the way I run all of my classes. For my engineering classes (which is where I would use this project) when we do more full fledge engineering projects, using a design process to guide us. If they test a prototype and it fails, I want them to look at that as more of a positive and less of a world ending disaster!
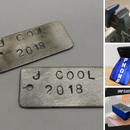
When all is said and done I tell my students their 3D model should look something like what is shown below.

After designing a few examples for my classes I realized that 1/4" thickness could probably work just as well as the 3/8" criteria I set for the project. I did have some issues when trying to edit some of the premade Tinkercad objects to work with a 1/4" thickness, but if you are looking to be more material efficient when 3D printing I think 1/4" could work fine.
Step 5: 3D Print
This step is optional. If you don't have a 3D printer, I think you can get the same result of letting the students tell you about themselves in a creative way with just the CAD model.
Once students are finished with their Tinkercad model, I check to make sure it fits the size requirement and for any other issues that might stop their design from coming out of the printer like they want it to. I then have them export their work to STL format.
To export for 3D printing in Tinkercad you can select the "Export" button on the top right corner of your screen, located above the shapes menu.
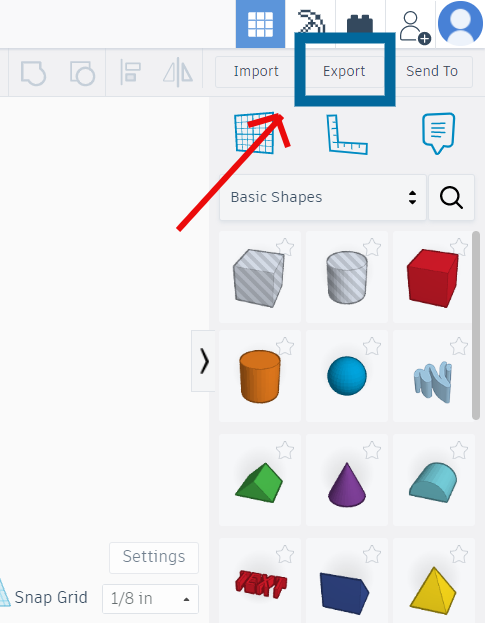
Once you select the export option the export menu will pop up on your screen. Select whichever file format you need to run on your printer. We use the STL file. After selecting the file format you need the model will begin exporting to your computer.

I show my students how to do this process. Then they either share their file with me through Google Drive or I have them save it directly to one of our classroom flash drives.
When I have four to six student designs ready, I start running them on our 3D printers. I give a quick overview of what 3D printing is, how it works, and the process used to run our printers. I don't have the students set up the printer on their own for this project just to save time.
With a class of 20 or so students and two 3D printers it usually takes around two days to finish all of the printing.
After all is said and done they come out looking like this.

If there is time, and if the students want to, I let them take the time to paint their crests for additional flare.

Step 6: Student Presentations (Optional)
Depending on how the schedule falls in our class I may have my students present their personal crests to the rest of the class.
I'll begin by presenting my own finished design again. I might show a different version than I used previously. If the class didn't ask me questions about mine before this allows them to now if the want.
I'll have the student's Tinkercad design projected up on the screen and have them discuss the four components of their design. I'll ask some questions, after they have speed through their whole project in about five seconds, to have them explain to the class a little more background on their goals or what they like to do for fun. After each presentation the entire class gives the presenter a raucous round of applause and we all leave class knowing each other a little better.
I've generally had good success with these types of presentations in my classes. It creates great classroom atmosphere on the day and sets up great a collaborative class learning environment for the entire year.
Step 7: The End Bit
Thank you so much for checking out my project. I truly appreciate people taking time to view my work. Please feel free to take this project and turn it into something better than what I have here. If you do let me know in the comments below or shoot me an email.
If you teach shop class of some kind I've started a little website to document/compile shop teacher content/curriculum. I'm really just getting started with it but I hope to be posting much more to it soon. Find it at Shop Class Builds.
Subscribe to my fledgling YouTube Channel Here.
Find me on Instagram @shopclassbuilds
Again thank you for taking time out of your day to scan through my project!

Judges Prize in the
Teach With Tinkercad Contest


